Mounting & Formatting External HDDs on Linux: Complete Guide
Properly setting up external hard drives on Linux systems is a fundamental skill for system administrators and power users. This comprehensive guide covers everything from initial drive identification to automated mounting, optimization, and maintenance of external HDDs on Linux systems.
Why Properly Mount External Storage?
Correctly configuring external HDDs provides several benefits:
- Data persistence: Automatic mounting across reboots
- Performance optimization: Proper filesystem and mount options
- System integration: Seamless access for applications and services
- Data safety: Proper permissions and filesystem integrity
Prerequisites
Before starting, ensure you have:
- A Linux system (Ubuntu, Debian, CentOS, etc.)
- An external HDD connected via USB, SATA, or other interface
- Root or sudo access
- Basic understanding of Linux command line
Step 1: Identify Your Drive
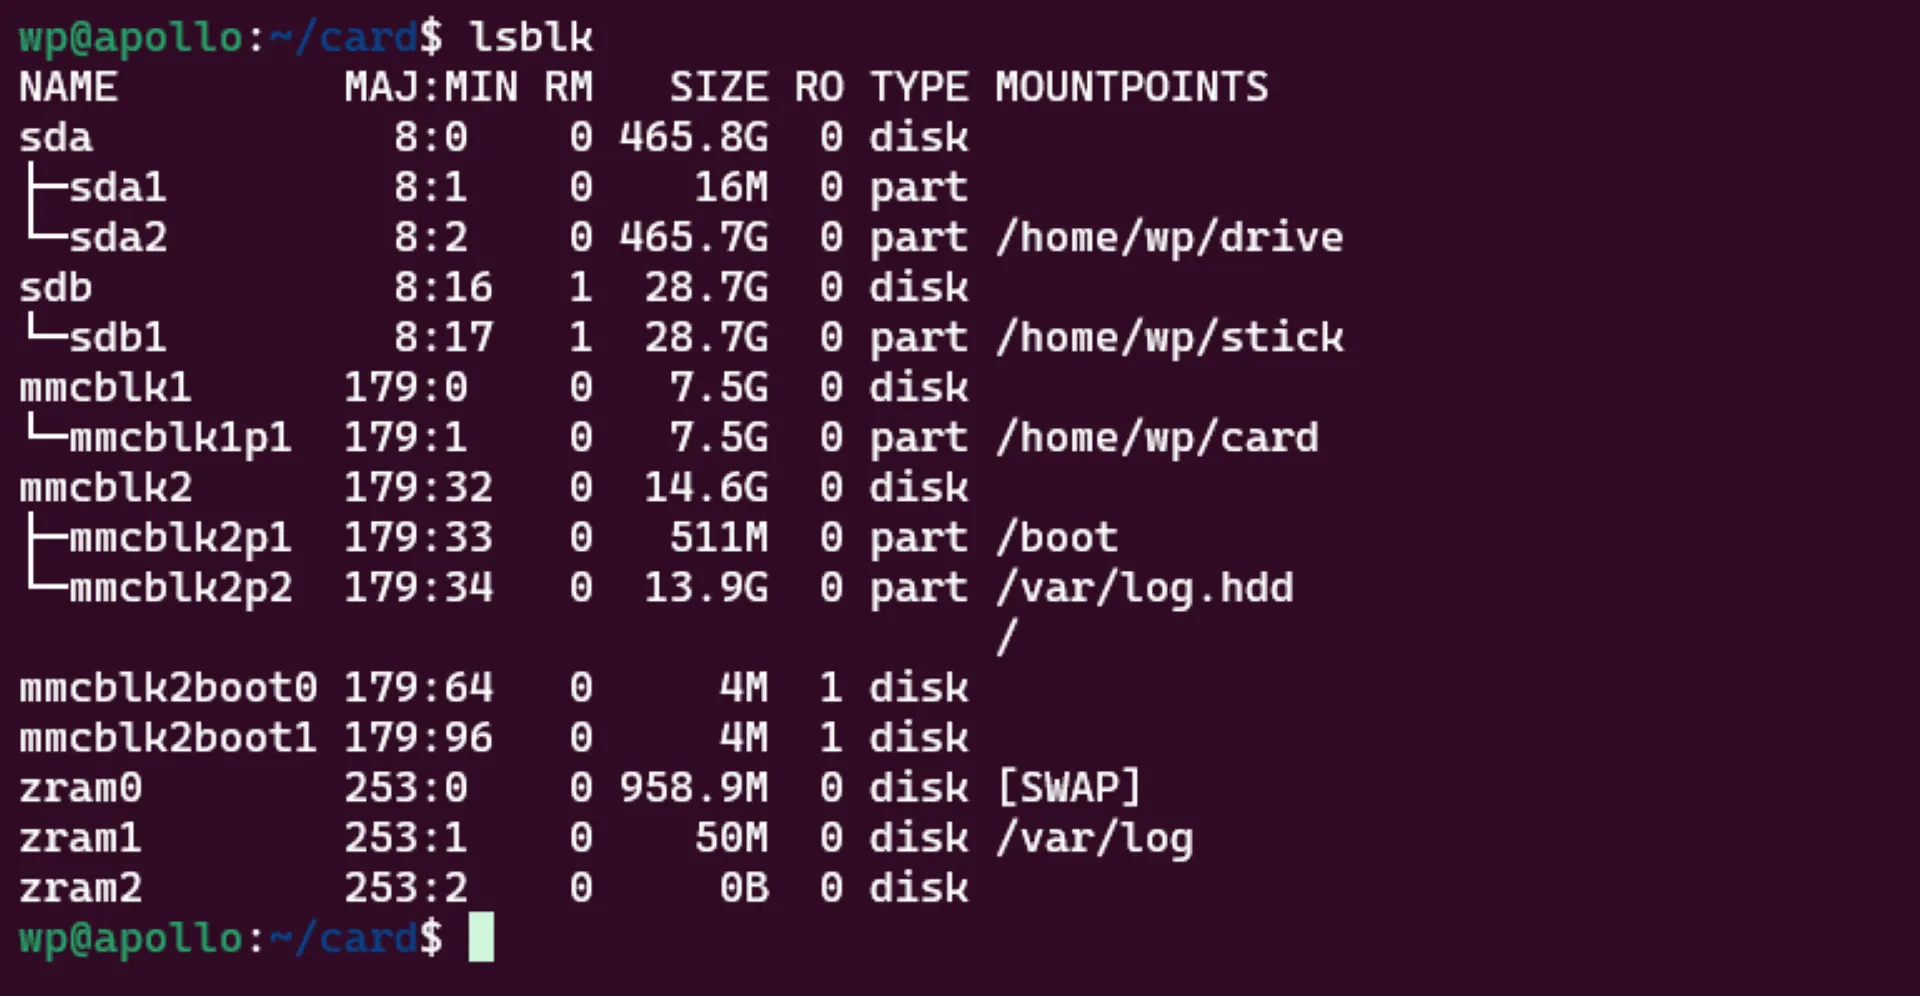
First, identify your external drive using the lsblk command:
lsblk
Example output:
NAME   MAJ:MIN RM   SIZE RO TYPE MOUNTPOINT
sda      8:0    0 931.5G  0 disk
└─sda1   8:1    0 931.5G  0 part
sdb      8:16   0 465.8G  0 disk
├─sdb1   8:17   0   512M  0 part /boot/efi
├─sdb2   8:18   0     1G  0 part /boot
└─sdb3   8:19   0 464.3G  0 part /
In this example, sda is our external 1TB drive with a single partition sda1.
Alternative identification methods:
# Show detailed disk information
sudo fdisk -l

# Display disk usage and mount points
df -h

# Show disk partitions with filesystem types
sudo blkid
Step 2: Format the Drive to EXT4 (optional)
⚠️ Warning: This will erase all data on the drive!
Format the partition to EXT4 filesystem for optimal Linux compatibility:
sudo mkfs.ext4 /dev/sda1
Verify the formatting:
# Check filesystem information
sudo tune2fs -l /dev/sda1

# Verify filesystem integrity
sudo fsck.ext4 -v /dev/sda1
Step 3: Create Mount Point Directory
Create a directory where the drive will be mounted:
sudo mkdir -p /mnt/hdd
Step 4: Manual Mount (Temporary)
Mount the drive temporarily to test the setup:
sudo mount /dev/sda1 /mnt/hdd
Verify the mount:
# Check if mounted successfully
df -h /mnt/hdd

# List mount points
mount | grep sda1

# Check available space
du -sh /mnt/hdd
If you're getting permission denied error when doing read or write to the mounted drive, you might need to run this command
sudo chown -R $USER:$USER /mnt/hdd
Mount with specific options:
# Mount with noatime for better performance
sudo mount -o noatime /dev/sda1 /mnt/hdd

# Mount with specific user and group
sudo mount -o uid=1000,gid=1000 /dev/sda1 /mnt/hdd
Step 5: Get Drive UUID
Obtain the UUID for permanent mounting configuration:
sudo blkid
Example output:
/dev/sda1: UUID="a1b2c3d4-e5f6-7890-abcd-ef1234567890" TYPE="ext4" PARTUUID="12345678-01"
/dev/sdb1: UUID="1234-5678" TYPE="vfat" PARTUUID="87654321-01"
Alternative methods to get UUID:
# Get UUID for specific device
sudo blkid /dev/sda1

# Using lsblk with UUID column
lsblk -f

# From /dev/disk/by-uuid/
ls -la /dev/disk/by-uuid/
Step 6: Configure Automatic Mounting
Edit the /etc/fstab file for permanent mounting:
sudo nano /etc/fstab
Add this line at the end of the file:
UUID=61383ace-274d-4fd1-897f-bc29e7d3046d /mnt/hdd ext4 defaults,nofail,noatime,x-systemd.device-timeout=5 0 0
Understanding fstab options:
- UUID: Unique identifier for the device
- Mount point: Where the drive will be mounted
- Filesystem type: ext4 in our case
- Options: Mount options (defaults,noatime)
- Dump: Backup operation (0 = no backup)
- Pass: Filesystem check order (2 = check after root filesystem)
Advanced fstab options:
# With additional performance options
UUID=a1b2c3d4-e5f6-7890-abcd-ef1234567890 /mnt/hdd ext4 defaults,noatime,nodiratime,barrier=0 0 2

# With user access permissions
UUID=a1b2c3d4-e5f6-7890-abcd-ef1234567890 /mnt/hdd ext4 defaults,noatime,user,users 0 2

# With error handling
UUID=a1b2c3d4-e5f6-7890-abcd-ef1234567890 /mnt/hdd ext4 defaults,noatime,errors=remount-ro 0 2
Step 7: Test Automatic Mounting
Test the fstab configuration without rebooting:
# Unmount the drive first
sudo umount /mnt/hdd

# Test fstab configuration
sudo mount -a

# Verify successful mount
df -h /mnt/hdd
Troubleshooting mount issues:
# Check fstab syntax
sudo mount -fav

# View mount errors
dmesg | tail -20

# Check filesystem for errors
sudo fsck.ext4 /dev/sda1
Basic Usage and Verification
Verify the Mount
After mounting, verify everything is working correctly:
# Check if mounted successfully
df -h /mnt/hdd

# List all mount points
mount | grep sda1

# Check available space and usage
du -sh /mnt/hdd

# Test write permissions
sudo touch /mnt/hdd/test-file
ls -la /mnt/hdd/test-file
sudo rm /mnt/hdd/test-file
Set Proper Ownership and Permissions
Configure appropriate ownership for your use case:
# Change ownership to current user
sudo chown $USER:$USER /mnt/hdd

# Set permissions for user access
sudo chmod 755 /mnt/hdd

# For shared access by multiple users
sudo chown root:users /mnt/hdd
sudo chmod 775 /mnt/hdd
Performance Optimization
Filesystem Mount Options
Optimize mount options for better performance:
UUID=a1b2c3d4-e5f6-7890-abcd-ef1234567890 /mnt/hdd ext4 defaults,noatime,nodiratime,barrier=0,data=writeback 0 2
Understanding Mount Options
- noatime: Don't update access times (reduces write operations)
- nodiratime: Don't update directory access times
- barrier=0: Disable write barriers for better performance (use with UPS)
- data=writeback: Faster but less safe than ordered mode
### I/O Scheduler Optimization

Optimize I/O scheduler for the external drive:

```bash
# Check current I/O scheduler
cat /sys/block/sda/queue/scheduler

# Set deadline scheduler for better performance
echo deadline | sudo tee /sys/block/sda/queue/scheduler

# Make permanent by adding to /etc/rc.local
echo 'echo deadline > /sys/block/sda/queue/scheduler' | sudo tee -a /etc/rc.local
Common Use Cases
Media Storage Setup
Configure for storing media files:
# Create media directories
sudo mkdir -p /mnt/hdd/{movies,music,photos,documents}

# Set permissions for media access
sudo chown -R $USER:$USER /mnt/hdd
sudo chmod -R 755 /mnt/hdd

# Test with sample file
cp ~/sample-video.mp4 /mnt/hdd/movies/
Backup Storage Setup
Configure for system backups:
# Create backup directories
sudo mkdir -p /mnt/hdd/backups/{system,home,config}

# Set secure permissions
sudo chown root:root /mnt/hdd/backups
sudo chmod 700 /mnt/hdd/backups

# Test backup functionality
sudo rsync -av /etc/ /mnt/hdd/backups/config/
Monitoring and Maintenance
Health Monitoring Tools
Install and configure monitoring tools:
# Install smartmontools for drive health monitoring
sudo apt install smartmontools -y

# Check drive health
sudo smartctl -a /dev/sda

# Run short self-test
sudo smartctl -t short /dev/sda

# Check test results
sudo smartctl -l selftest /dev/sda
Automated Health Checks
Create a monitoring script:
sudo nano /usr/local/bin/hdd-monitor.sh
#!/bin/bash
# HDD Health Monitoring Script

MOUNT_POINT="/mnt/hdd"
DEVICE="/dev/sda1"
LOG_FILE="/var/log/hdd-monitor.log"

# Check if mounted
if ! mountpoint -q "$MOUNT_POINT"; then
    echo "$(date): ERROR - $MOUNT_POINT not mounted" >> "$LOG_FILE"
    # Attempt remount
    mount "$DEVICE" "$MOUNT_POINT"
fi

# Check disk space (alert if less than 10% free)
USAGE=$(df "$MOUNT_POINT" | awk 'NR==2 {print $(NF-1)}' | sed 's/%//')
if [ "$USAGE" -gt 90 ]; then
    echo "$(date): WARNING - Disk usage at ${USAGE}%" >> "$LOG_FILE"
fi

# Check SMART status
SMART_STATUS=$(smartctl -H "$DEVICE" | grep "SMART overall-health" | awk '{print $6}')
if [ "$SMART_STATUS" != "PASSED" ]; then
    echo "$(date): ERROR - SMART health check failed: $SMART_STATUS" >> "$LOG_FILE"
fi

echo "$(date): Health check completed - Usage: ${USAGE}%, SMART: $SMART_STATUS" >> "$LOG_FILE"
Make it executable and add to cron:
sudo chmod +x /usr/local/bin/hdd-monitor.sh

# Add to crontab (run every hour)
echo "0 * * * * /usr/local/bin/hdd-monitor.sh" | sudo crontab -
Power Management
Configure power management for external drives:
# Install hdparm for power management
sudo apt install hdparm -y

# Set spin-down timeout (120 = 10 minutes)
sudo hdparm -S 120 /dev/sda

# Make permanent
echo '/dev/sda {spindown_time = 120}' | sudo tee -a /etc/hdparm.conf
Backup and Recovery
Data Backup Strategies
Create backup scripts for important data:
sudo nano /usr/local/bin/hdd-backup.sh
#!/bin/bash
# HDD Data Backup Script

SOURCE_DIR="/mnt/hdd"
BACKUP_DIR="/backup/hdd"
DATE=$(date +%Y%m%d_%H%M%S)

# Create backup directory
mkdir -p "$BACKUP_DIR"

# Create incremental backup
rsync -av --link-dest="$BACKUP_DIR/latest" "$SOURCE_DIR/" "$BACKUP_DIR/backup_$DATE/"

# Update latest symlink
rm -f "$BACKUP_DIR/latest"
ln -s "backup_$DATE" "$BACKUP_DIR/latest"

# Clean old backups (keep last 30 days)
find "$BACKUP_DIR" -maxdepth 1 -name "backup_*" -mtime +30 -exec rm -rf {} \;

echo "Backup completed: backup_$DATE"
Recovery Procedures
In case of drive failure or corruption:
# Check filesystem for errors
sudo fsck.ext4 -f /dev/sda1

# Attempt automatic repair
sudo fsck.ext4 -y /dev/sda1

# Mount in read-only mode for data recovery
sudo mount -o ro /dev/sda1 /mnt/recovery

# Copy important data before repair
cp -r /mnt/recovery/important-data /backup/emergency/
Security Considerations
File Permissions
Set appropriate permissions for your data:
# For personal use
sudo chown -R $USER:$USER /mnt/hdd
sudo chmod -R 755 /mnt/hdd

# For shared access
sudo chown -R root:users /mnt/hdd
sudo chmod -R 775 /mnt/hdd

# For sensitive data
sudo chmod -R 700 /mnt/hdd/private/
Encryption (Optional)
For sensitive data, consider encrypting the external drive:
# Install cryptsetup
sudo apt install cryptsetup -y

# Set up LUKS encryption
sudo cryptsetup luksFormat /dev/sda1

# Open encrypted device
sudo cryptsetup luksOpen /dev/sda1 docker-encrypted

# Format encrypted device
sudo mkfs.ext4 /dev/mapper/docker-encrypted

# Mount encrypted device
sudo mount /dev/mapper/docker-encrypted /mnt/hdd
Troubleshooting Common Issues
Mount Failures
# Check for filesystem errors
sudo fsck.ext4 -f /dev/sda1

# Force mount with specific options
sudo mount -o force /dev/sda1 /mnt/hdd

# Check system logs
sudo journalctl -u systemd-fstab-mount
Docker Service Issues
# Check service status
sudo systemctl status [service-name]

# View service logs
sudo journalctl -u [service-name]

# Restart services that use the mount
sudo systemctl restart [service-name]
Performance Issues
# Monitor I/O performance
iostat -x 1

# Check for high I/O wait
top
htop

# Analyze disk usage patterns
iotop
Best Practices
General Guidelines
- Regular health checks: Monitor drive health with SMART tools
- Backup strategy: Implement automated backups of critical Docker data
- Performance monitoring: Track disk usage and I/O performance
- Security: Set appropriate permissions and consider encryption
- Documentation: Keep records of UUIDs, mount points, and configurations
Optimization Tips
- Use noatime mount option: Reduces write operations
- Choose appropriate filesystem: EXT4 is generally best for Linux
- Monitor disk space: Set up alerts for low disk space
- Regular maintenance: Check filesystem integrity periodically
- I/O scheduler: Use deadline scheduler for better performance
Maintenance Schedule
- Daily: Check disk space usage
- Weekly: Review system logs for mount-related issues
- Monthly: Run SMART health checks and filesystem checks
- Quarterly: Perform full backup and test recovery procedures
Conclusion
Properly mounting and formatting external HDDs on Linux systems provides a solid foundation for data storage and system expansion. This comprehensive setup ensures:
- Reliable storage: Proper formatting and mounting procedures
- Automated operations: Persistent configuration across reboots
- Performance optimization: Optimized mount options and I/O settings
- Monitoring capabilities: Health checks and usage monitoring
- Data protection: Backup and recovery procedures
Key achievements:
- Successfully formatted and mounted external HDD
- Configured automatic mounting across reboots
- Implemented monitoring and maintenance procedures
- Established backup and recovery processes
- Optimized performance for various workloads
Regular maintenance and monitoring ensure your external storage setup remains reliable and performs optimally. Always test backup and recovery procedures to ensure data safety and system availability.
Remember to adapt these procedures to your specific hardware and requirements, and always maintain current backups of critical data before making system changes.